SI Editor Table Menu - Insert
![]()
![]()
This command can be executed from the Editor's Table Menu and Toolbar.
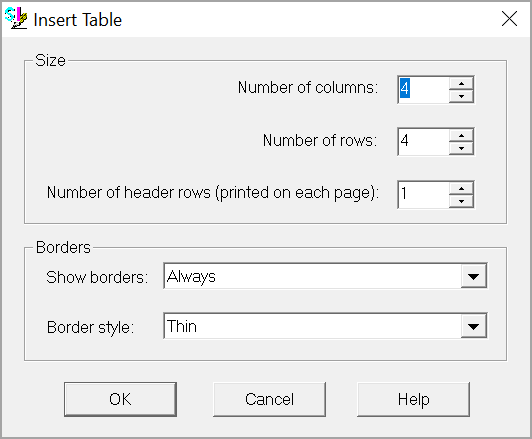
Opens the Insert Table window to design a professional Formatted Table for organizing text and data into rows, columns and cells. Tables are for displaying organized data in your Section.

Allows you to choose the number of columns needed to create a Formatted Table.
Allows you to choose the number of rows needed to create a Formatted Table.
Allows you to choose the number of rows needed to print at the top of each page of a Formatted Table when the table cannot fit on one page.
By default, the selected setting is set to 'Always.' Choose whether the borders appear 'Only On Screen,' 'Only When You Print' or 'Never.'
By default, the selected setting is set to Thin. Choose whether the Border Style for the Formatted Table will be thin, medium or Thick.
These features become available once the Formatted Table has been created to provide the capability to insert rows or columns, above or below the selected cell.
Will Insert the same number of selected row(s) above the row(s) where the cursor is positioned.
Will Insert the same number of selected row(s) below the row(s) where the cursor is positioned.
Inserts a new column before the column where the cursor is positioned.
Inserts a column to be inserted after the column where the cursor is positioned.
![]() Unlike
inserting Rows, you can only insert one column at a time.
Unlike
inserting Rows, you can only insert one column at a time.
![]() To
learn more, see the Table
Tips and Tricks topic.
To
learn more, see the Table
Tips and Tricks topic.
 The OK Button will
execute and save selections made and make them part
of your Job's properties.
 The Cancel Button will
close the dialog box without recording any selections or changes entered.
 The Help Button will
open the Help Topic for this dialog box.
From the SI Editor's Tagsbar, select
the Formatted Table button  or select the Table
Menu > Insert > Table.
From the Insert Table window, below the Size section use the arrow keys to select the Number of columns, Rows and/or Header rows
Below Borders, choose the border style you wish to use
Select OK
Use the SI Editor's Table Right-click Menu
Place your mouse over the cell within a row or column then right-click
Choose Insert and choose to either Insert Row Above/Below or Insert Column Before/After
![]() Watch
the Formatted Tables eLearning
Modules within Chapter 3 - Getting Started.
Watch
the Formatted Tables eLearning
Modules within Chapter 3 - Getting Started.
Users are encouraged to visit the SpecsIntact Website's Help Center for access to all of our User Tools, including eLearning Modules (video tutorials), printable Guides, Knowledge Base containing Frequently Asked Questions (FAQs), Technical Notes and Release Notes, and Web-Based Help. For additional support, contact the SpecsIntact Technical Support Desk at (321) 867-8800 or KSC-SpecsIntact@mail.nasa.gov.