SI Editor Table Menu - Tips and Tricks
![]()
![]()
Before you begin editing a new Formatted Table it is important to understand how they function. SpecsIntact Formatted Tables are a unique breed specifically designed for the SpecsIntact Editor. There are several menu items available while working in tables, either by choosing the Table dropdown menu or taking advantage of the right-click menus. In order to make editing Formatted Tables easier, tags will only display while in the Edit Mode, even if the tags display is turned on.
![]() To avoid display issues, do not place text or brackets on the same line as a Formatted Table.
To avoid display issues, do not place text or brackets on the same line as a Formatted Table.
For the best experience editing Formatted Tables with Revisions, we recommend duplicating the Formatted Table by: 1) selecting the Table 2) copying, 3) deleting, and then 4) pasting it below the existing Formatted Table. By doing this, the ADD and DEL tags will be eliminated from each cell that has been edited, making the Formatted Table easier to edit and read.
In the illustration below, the original Formatted Table was deleted and is now surrounded with DEL tags, whereas the new Formatted Table (duplicate), was added and surrounded with ADD tags. Therefore, the customer knows you have deleted the original Formatted Table and replaced it with a new one.

The SI Editor's Copy, Copy Without Tags, and Paste commands can be used in many ways. You can either copy and paste text into a table cell(s), column(s), or row(s) or into the same table or other SI tables,
![]() First you must Insert the required blank row(s) or column(s).
First you must Insert the required blank row(s) or column(s).
Once you have the blank row(s) or columns, you must highlight the blank cell(s), column(s) or Row(s) After selecting the table cell(s), row(s), or column(s), press Ctrl+V or right-click and choose Paste
into other applications, such as Microsoft Excel spreadsheets or Word tables.
After selecting the table cell(s), row(s), or column(s) or table from an Excel spreadsheet or Word table into a SI Formatted Table, you must first Insert either a row(s), column(s) or Formatted Table.
Some organizations are no longer permit users to Save Excel XML spreadsheets. SpecsIntact has simplified the process to Import Excel spreadsheets, Word and other application tables using the Copy and Paste command.
To copy and paste a Formatted Table use the Editor's Toolbar Copy and Paste Buttons, Right-click Menu or the keyboard shortcuts Ctrl+C to Copy, or Ctrl+E to Copy Without Tags or Ctrl+V to Paste.
When you are copying and pasting selected Row(s) or Column(s), you will need to insert a new Row or Column to receive the pasted data.
![]() The capability to Copy or Paste multiple Table row(s), column(s) or an entire Formatted Table requires SI v4.5.1 or newer
The capability to Copy or Paste multiple Table row(s), column(s) or an entire Formatted Table requires SI v4.5.1 or newer
To Copy an Excel spreadsheet, Word or other table into a SpecsIntact Formatted Table:

![]() To save edits within a Formatted Table, the cursor MUST be in another cell, outside of the one being edited or outside the table.
To save edits within a Formatted Table, the cursor MUST be in another cell, outside of the one being edited or outside the table.
The Formatted Tables edit mode is activated by left-clicking in a cell to begin inputting the data, formatting and/or tagging.

While in edit mode, the SpecsIntact Editor will not display colors, and will always show hidden text and tags. These limitations will not apply when viewing or printing tables.
The Merge and Unmerge Cells features are not available from the Table Menu unless two or more cells are selected or the cell is a merged cell.
The Undo and Redo buttons are not always available, so it appears as though this feature cannot be used. The trick to using Undo and Redo with Formatted Tables, is to place the cursor outside of the Table then select the correct command.
![]() Once the Section is saved, the Undo and Redo features are reset.
Once the Section is saved, the Undo and Redo features are reset.
There are three right-click menus available while working with Formatted Tables.
Is activated by placing the mouse over the row or cell then right-clicking. This menu provides options available for changing the entire table. This menu provides options available for changing the entire table.
![]() The Merge and Unmerge Cells feature is not available from the Table Menu or the Editing Menu unless two or more cells are selected or the cell is a merged cell however, the Unmerge All Cells feature is available. To learn more, see the Unmerge All Cells topic.
The Merge and Unmerge Cells feature is not available from the Table Menu or the Editing Menu unless two or more cells are selected or the cell is a merged cell however, the Unmerge All Cells feature is available. To learn more, see the Unmerge All Cells topic.
Menu options that appear inactive require either cell(s), row(s), column(s) or text to be selected. Click on the image menu option below to display details for each function.

The third menu is an Editing Menu that is available while in Edit Mode. To activate the Edit Mode menu click in the cell, then right-click.
The Edit Menu provides features such as Copy, Cut, Delete, Paste, Undelete Redlined Revisions, Delete Added Revisions, and Remove All Revisions. For additional convenience this menu also provides an extensive pop-up Table Menu.

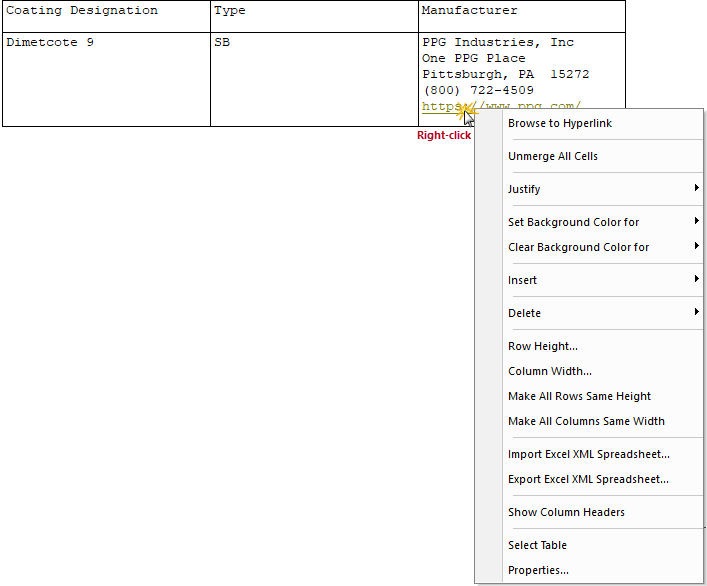
The second menu is activated by placing the mouse over a hyperlink then right-clicking and choosing Browse to Hyperlink. Choosing this function will open the hyperlink in your default Browser (i.g. Google Chrome, Internet Explorer, etc.).
Can be done by left-clicking and dragging the mouse cursor -- or --selecting the first cell, holding down the Shift key and clicking on the additional cells

It is recommended that while working with SpecsIntact Tables the View > Tags  command is turned off. It also is encouraged to enter all of the information into the table prior to tagging. This will make editing in SpecsIntact Tables less complicated.
When adjusting Row(s) begin adjusting rows from bottom to top of the Formatted Table or use the Row Height command. When adjusting Column(s) begin adjusting the columns from right to left or use the Column Width command.
Tailoring Options can be applied to an entire table, however, the Tailoring tag must be on the same line as the Formatted Tables TAB tag. Tailoring within a table becomes more complicated when adding or removing Tailoring Options since there is no way to tailor an entire row or column. In order to apply Tailoring, the data within the cells are tailored individually. When using the Tailoring Options tool to remove these options, blank rows or cells will remain,therefore, they must be manually deleted by the individual editing the Section.
Inserting Brackets within a Formatted Table is more complex. The complexity exists when a row or multiple rows need to be bracketed.
One option can be applied by separating a Table into smaller sets of tables, then add the brackets just before the beginning <TAB> tag and just after the </TAB> tag. An illustration of this method can be found in UFGS Section 26 32 15.00 10 entitled
DIESEL-GENERATOR SET STATIONARY 100-2500 KW, WITH AUXILIARIES, paragraph "Engine-Generator Parameter Schedule."
Another way is to consider keeping the data that would be surrounded by brackets in one cell, then place the brackets around that information, and carry the technique across each cell in that row. This way, if the bracketed option is removed all of
the cells contents would also be removed. When the contents are removed from those cells using the Bracket Replacement feature, the row will also need to be deleted. An illustration of this method can be found in UFGS Section 26 32 15.00 10 entitled
DIESEL-GENERATOR SET STATIONARY 100-2500 KW, WITH AUXILIARIES.
Users are encouraged to visit the SpecsIntact Website's Help Center for access to all of our User Tools, including eLearning Modules (video tutorials), printable Guides, Knowledge Base containing Frequently Asked Questions (FAQs), Technical Notes and Release Notes, and Web-Based Help. For additional support, contact the SpecsIntact Technical Support Desk at (321) 867-8800 or KSC-SpecsIntact@mail.nasa.gov.